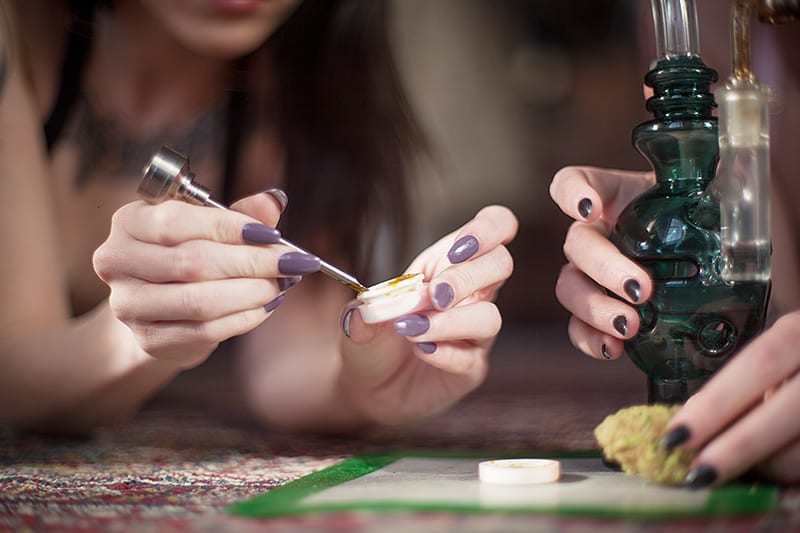
Is it possible to have a dab rig set up that gives you everything you need for the perfect dab within arms reach, that also matches your sense of style and decor? We think so! And we have some tips and tricks to make a heat-resistant, easy-to-clean tray, with matching rubbing alcohol and swab storage that will look stunning on your coffee table (or wherever you choose to display it)! Best of all, it won’t break the bank and it’s very affordable! Most of the items required for this project can be found at second-hand stores or made using repurposed items from around your home. There is a lot of room for creativity in this project, so let your imagination go wild! If you’re new to dabbing and would like a helpful reminder about the tools and equipment needed to dab, watch our video Dabbing Techniques: How to Cold Dab.
What you’ll need:
-
- An attractive tray with a flat bottom: should be large enough to fit the accessories listed below, as well as your torch or any additional dab tools you’d like to put on your tray. We will be covering the bottom of the tray, so look for options that are made of unique materials or have beautiful handles.
- Inexpensive Silpat style mat: this should be large enough to cover the bottom of your tray. Don’t worry if it’s larger, as they are easy to cut with scissors.
- 2 q-tip swab holders: one will hold clean swabs and the other will collect the dirty ones. You can use anything that is large enough to hold a few q-tip style swabs. Shot glasses, candle holders, old wide-mouthed spice jars, or weed containers would all work well.
- Small 1-2oz bottle with tight-fitting lid: this will be filled with rubbing alcohol, to dip your swab into to clean your banger post-dab.
- Q-tip swabs, and 91% rubbing alcohol: to fill your swab holders and bottle.
- Optional: holders for any additional tools you like to use. Look for something that matches the rest of your setup. Select materials that you can clean with rubbing alcohol.
Additional Tools:
- Large sheet of scrap paper- newspaper or a paper bag would work fine
- Scissors
- Ballpoint pen
- Optional decorations: spray paint, glitter, fabric, stickers, paint pens
The Steps
- We will use the sheet of scrap paper to make a template of the bottom of the tray. Place the sheet of paper loosely into the bottom of the tray and press it into the corners of the tray to make an indentation in the paper of where the walls of the tray meet the bottom. Lightly trace the shape with your pen. This should give you the shape of the bottom of your tray.
- Remove the paper from the tray, and cut your template out. Place it back in the tray to make sure it’s a good fit. Make any adjustments you need to make it fit the way you like.
- Once you’re happy with your template, trace it onto your Silpat mat using your ballpoint pen. It will wipe away fairly easily, so be mindful of smudging it.
- The fun part! Cut your Silpat mat out and enjoy the sensory experience of snipping through silicone and mesh. It’s weirdly satisfying.
- Assemble! Place your Silplat mat into the bottom of your tray. Fill your small bottle with rubbing alcohol, and put the q-tips into one of your swab holders. Add any additional tools or details you like, and voila! You have a beautiful dab set up that blends seamlessly with your decor, and is also functional.
- To clean your tray: remove the Silpat from the tray, put it on a flat surface, and roll over it with a sticky lint remover or a piece of tape. Sticky messes should lift easily, and any residue can be wiped away with a paper towel and some rubbing alcohol.
Style and Design Ideas: if you decide to decorate your tray, be certain everything has dried and cured thoroughly before use.
-
- Spray Paint! Create a designer look for your set by selecting a color scheme and painting all the elements of your setup. You could have a dramatic monochromatic look, a bright juicy neon look, or even tailor the color scheme to your decor. Select a spray paint that is good for multiple surfaces and finish your project with a protective clear coat. Remember, rubbing alcohol removes spray paint, so don’t paint your rubbing alcohol bottle.
- Decoupage! Inject your personality into your setup by adding images from books and magazines to your tray and accessories using Mod Podge or any acrylic gel medium. If you can, try to use Hard Coat Mod Podge for a more finished look that will withstand being handled better.
- Get Reflective! Create a sparkling finish on the outside of your tray using unique self-adhesive sheets such as mirror sheets, mosaic tiles, bling wraps, or glitter paper. You could also use peel and stick wallpaper in a similar way if you want a less glitzy look.
 Break in your new dab rig setup with the following concentrates available at Dockside or talk to your Budtender for recommendations today!
- Fire Bros – Gold Label – LA Kush Cake
- Lifted – Boysenberry Creme Brulee Rosin Jam
- Oleum – Wonka Bars Honey Crystal
Need a refresher on the equipment and different pieces that make up a dab rig? We’ve got you covered with Anatomy of a Dab Rig.